
The WMR200A comes as a complete system with the exception of the UVN800 detector which is displayed on the main screen even if you have no sensor. There are several things not mentioned in the above manual that you may want to consider during setup or installation of hardware.
1.) Location is not only important, it's critical! Your system will not function properly if there is too great a distance or too many objects between the sensor and the base unit. Signal for the atomic clock is also affected by objects between the unit and the sky. There are several modifications available that discuss different ways to passively increase your signal. Disassembling the unit voids any warranty and you may well damage the unit beyond repair.
2.) Sensor location is so critical only because you want the best information they can provide.
2a.) The Anemometer should be placed at the highest point of your home, or on a pole mounted between 24 and 36 feet above ground level. It should also be away from objects that could obstruct air flow for speed and direction. This unit should be connected with a solar unit as you will not be able to get to this unit as readily as the other sensors. This item should also point true north not magnetic north. There are several websites on the web that will give you the declination you need to correct. Set it magnetically in the air, set it true in the program, most programs have a location to put in the offset. This item can also freeze up, and you’re out the data during an ice storm and such, believe me your not missing all that much. Your wind vane and gauge will begin spinning as the temperature rises. During most ice storms there is no wind, and therefore the direction matters very little.

2b.) Thermal/Hygrometer is a tricky one. This unit has a solar power hook so use it (extra purchase required) the radiation shield might be inadequate. Placing this even in indirect sunlight gives oddly wild readings dependant on what Lat/Lon you’re on. This is not always the case but it can often cause transmission problems to the base unit. Removal of this is not an option because you cannot expose the sensor to direct sunlight or elements. Consider building your own aspirated thermal box the directions are online in many locations. Place this unit as close to your base unit without overstepping the range of limitations.
2c.) Rain Gauge is a modern nightmare. This seems to be the 2nd most troubled part of this system. The primary complaint is dropped signal or no signal when it’s really needed most. The trouble here is the antenna is inside the actual rain gauge. In previous editions like the WMR-968 the antenna was hooked to the solar unit. This one however has no solar unit and is solely powered on AA batteries. Making the design great but the signal quality poor! There are several modification around the web that help remedy some of it, but remember disassembly voids the warranty! Make sure the gauge is out from under trees, eves power lines, bushes. It must be in as open a spot as possible. A primary consideration when installing this device is to make sure the device is level, your readings will be more accurate. This unit freezes in the winter; several heater modifications are available on the web. These are dangerous attempting them is at your own risk so be careful if making any modifications!

2d.) UV Sensor is a challenge all its own. It presents a unique problem only because as you know not everyone lives at the equator and gets 100% of the sun’s rays every day. So setup should be simple right? Wrong! The following things present a challenge. Straight up and down only works at the equator, so follow your declination based on your Lat/Lon and tilt it accordingly as if you were actually on the equator. Wish it was that simple. You may have to do random adjustments till you get it just right. The sun straight above your head should give you the highest reading. So take the base unit and sit outside at the high point, aim the sensor in several directions finding the highest reading. Remember the angles then attach it similarly to the rain gauge, away from structures, trees/shrubs, and anything that would block it. It must get as much sunlight as absolutely possible for accuracy over a day. This unit has a transmission issue as do most of the sensors. As close the base unit without obstacles either indoors or out.
3.) The Base Unit of course receives everything your sensors are sending. It also has its own sensors for barometric pressure, indoor temp/hum and the atomic clock. Setting these as I have found are extremely complex. The barometric pressure is based on how high you are above MSL (Mean Sea Level) your barometric pressure will be lower as you rise in altitude. There are several online converters for entering uncorrected barometric pressure to true altitude adjusted pressure. Please remember the following. It is not always accurate so compare it to your local airport; you should only be a few MB (millibars) off from them if they are near your altitude. The station allows for adjustment based on elevation but it is tricky. Doing the comparison helps. You can use Google maps to find your elevation above sea level. Also it’s handy to find out your GPS location down to the fraction. The base unit has a very small antenna; this is the 433 MHz antenna length. If you use passive measures please use a wire only as long as the antenna, 1 or 2xs the length generally helps with signal loss. Use of a solid copper core wire seems to be the best, as it also holds a straight up and down shape and is easily bent to shapes needed. The backlight can be turned on and off, I recommend you leave it off if you’re in a well lighted room and can see the device. It’s not very bright but in a dim lit room it’s sufficient for viewing without strain. If you’re going to use an extension USB cable make sure the length of the 2 cables does not exceed 25 feet. The signal will lose integrity past that length and your program will not be able to keep up to speed. If you can’t take your sensors to the base then take your base to the sensors. Move it closer to the sensors locations to get a better signal. If you’re like many you don’t even use the main panel for looking at the data as its sent to webpage’s you can view in an instant that has your latest live data, so it’s ok if you can’t see your base unit.
These units are very tricky, and with their price you would expect something slightly more stable and solid. You can not exactly put your base unit right on the sensors as it would make it an impractical device. So take my suggestions or don’t. Sometimes its just a matter of small moves. Always SMALL!
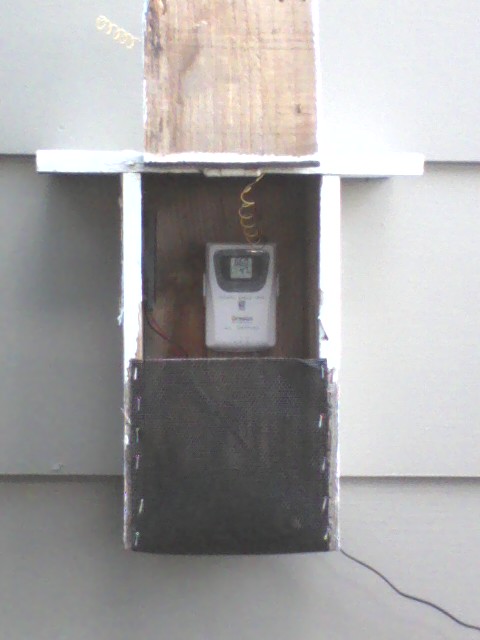
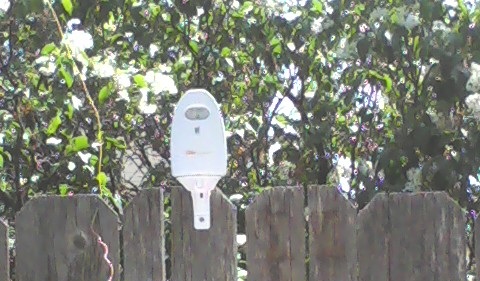
The Temperature Sensor Box Builing The Box
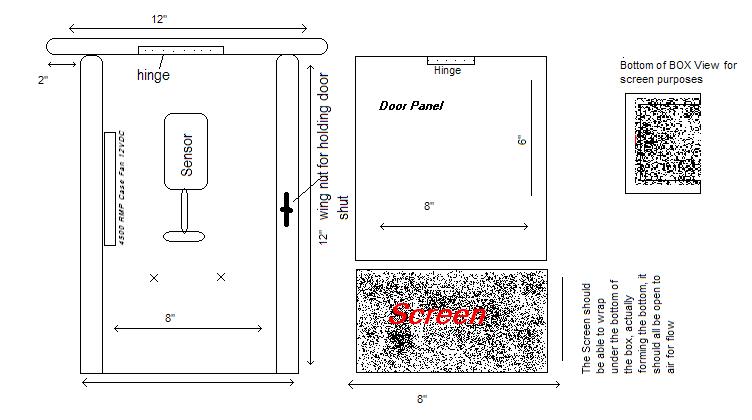
When constructing this box remember to make sure you use sturdy wood. Cured dry wood is preferable. This box may be painted a bright semi-gloss white to reflect as much sunlight away as possible, use exterior paint to prevent peeling. In this view facing straight at the box you will notice the screen is exactly 6 inches wide, the reason for this is to cover the entire bottom area, to prevent bee, or other critters from making it their home. Staple the screen, so that it covers not only the rest of the front panel, but the bottom of the box as well (size 6x4 inches will do). Ventilation is the key here. The Side panels only shown here from the front view are 1x6 inch boards. This box can be built to different dimensions based on space, but remember to have 1 inch of clearance on all sides of the sensor for air flow purposes. Make sure the fan is at least ½ inch from the sensor simply because it can vibrate causing the sensor to wear out, or get damaged, that’s why it’s this distance from the sensor. You can attach the sensor with the screws that come with your station; you can attach the box to anything with long wood screws. Do not face it any were from S to W on the compass as most storms in the Northern Hemisphere come from that direction and can cause your screen to become clogged in winter with ice and snow, and wind can push rain into the sensor if it’s strong enough. So take care in positioning the box. I make no guarantees or warranties on these items. I state clearly it’s your preference if you do. This is a poor mans way of overcoming errors in construction of the station which I must say is lacking.
The Rain Guage Box Heater Building The Box

When constructing this box remember to make sure you use sturdy wood. Cured dry wood is preferable. This box may be painted but remember this is a year round box, its going to get hot in the summer in that box, if its out in the open, so its your call, black in winter, white in summer, use exterior paint to prevent peeling. You may also do as I did, on the left side of the box near the gauge, that you can cover in winter, I used a spare piece of wood, I cut a hole about 3 inches, in summer I put screen on it, in winter I place my block back over it, and screw it into place with 4 corner screws and caulk around it for sealant. I was able to then paint it white and leave it be. This box length should not be altered due to overheating possibilities, and you can also change the wattage of the bulb depending on how cold it gets where you live. I have found using a 40-60 watt bulb will do fine if you get no lower then 10 to 15 degrees, and 60-100 watt bulb if temperatures drop or dip below 0 degree’s Fahrenheit. The solid block in the middle of the box can be painted with a silver paint or white paint, or can be wrapped in aluminum foil so that the heat is not absorbed by the block, this is not necessary but it can help if snow is coming down at more then 2 inches an hour. The faster the melt the better! This box has given me the ability to melt 4 inches of snow an hour, this is with a 100 watt bulb, and the block just plain. You will have to experiment to find your perfect situation. It can also be painted silver or bright white as I said. A 1x8 inch 12 ft board was used to construct the entire box, the rest of the hardware was bought at the local hardware store. This box can have a hinged top but I don’t recommend it simply because wood can warp, a hinged front is not good either, the reason for this is, every crack in the box will be sealed with caulking of your choice. Standard white, and waterproof and approved for all weather conditions because remember the box is going to be warm inside while the outside temperatures are freezing. To get the hole for the top of your gauge, you can use the gauge as a template. Simply shut down your station for a short time, and use the gauge as a trace marker, then when you get it cut, you can sand inside the hole to let the gauge slide into it from the bottom but fit tightly. Remember do not place blocks under the gauge’s feet until you have a measurement of how far the gauge will fit into the hole at the top. The feet are attached to wooden blocks that attach to the bottom of the box; they will vary depending on how far you want the gauge poking out of the box. I recommend no more the ½ to ¾ inches at most. The feet will be different sizes; you will have to sand or cut them to size. Use of these is so that there is something to hold the gauge in place all the time in its hole and keep it in place. You may caulk around the gauge top if you desire. You may simply have to experiment to get it to your liking. I know I went thru 9 different designs, and many frustrating hours to come up with this. So I hope this works for you. If you’re into green technologies like me I use a 60 watt compact florescent corkscrew light. It produces enough heat to melt 1-2 inches and hour, and since it’s contained inside a pretty much enclosed structure the only heat escape is thru the drain holes under the gauge which isn’t enough to affect the results. This box does not need to stay plugged in during nice weather, or uneventful days, or simply when there is no weather goodies to measure. You can also set this on a timer, that way it only comes on at certain times of the day or night, you can tinker with light types as I said, however it takes less electricity to just let it run. During a power outage you’re pretty much out of luck anyways. You machine will still register it but the light will be off and the melting will eventually stop. It’s a personal choice I made. I tried expensive electrical heaters you find on web pages on the net, absolutely and utterly useless not to mention more expensive then you really want to spend. Did I mention they are useless, and don’t really work as well as the inventors claim? I make no guarantees or warranties on these items. I state clearly it’s your preference if you do. This is a poor mans way of overcoming errors in construction of the station which I must say is lacking.